Install DYMO 450 series printer
1. Install labels into printer
- Unpack printer and plug into power.
- Load labels into the printer. They go face down. ( DYMO LabelWriter Manual)
- Press ^ on printer to feed a single label.
- Note: if you cannot reliably feed a single label, eVisitor will probably not be able to print.
2. Configure Windows
- Plug the USB cord into the computer and load the driver. (32-bit) (64-bit) (ver 8.3.0.443)
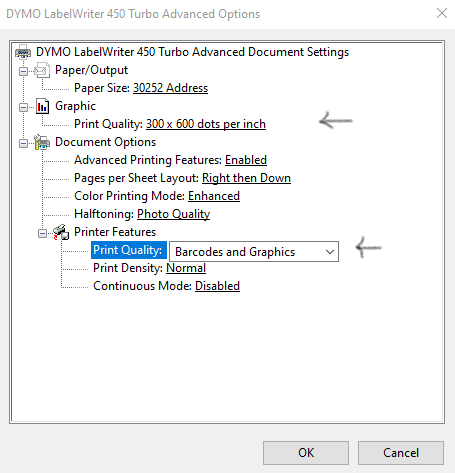
- Start, Devices and Printers, r-click on Printing Preferences, Advanced:
- Set "Graphic: Print Quality" to 300 x 600 dots per inch
- Set "Printer Features: Print Quality" to Barcodes and Graphics
- Print a test page.
- Note: If you can't reliably print a Windows test page, eVisitor will probably not be able to print.
3. Configure eVisitor
- Login to eVisitor.
- Goto settings, devices, "Reset printer to defaults".
- Test by printing several badges.
Troubleshooting
- DYMO USB 3 printing issue: LabelWriter USB 3 Fix.
- Uninstall DYMO drivers: C:\Program Files(x86)\DYMO\Dymo Label Software\Support\LWSupport.exe.
Copyright 2020 Data Management, Inc. All rights reserved.
1.800.243.1969