Primera Printer settings
Primera LX 400
- Note: DON'T load the software from the enclosed CD. It has unnecessary software.
- Get the Primera LX400 PC Printer Driver: (click here for ver 1.35) (or get the latest from primera's site)
- Set Printer sensor to ( 2" ?) (click here).
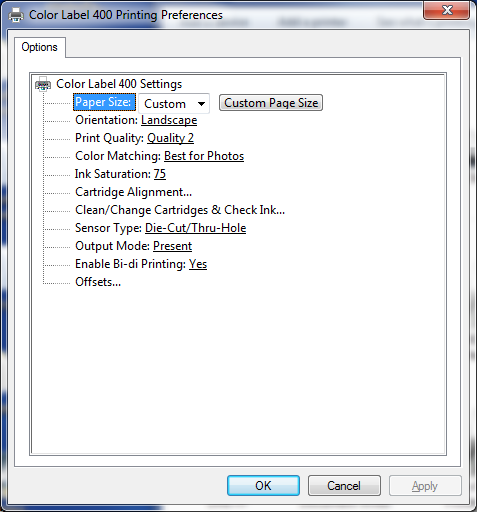
- Start, Devices and Printers, r-click on Color Label 400, Printing Preferences
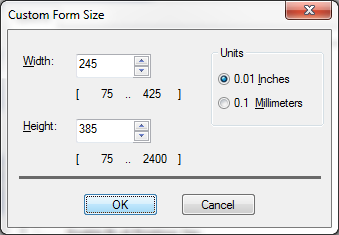
- Set Custom Page Size, Inches.
- 4" badges: Width=245, Height = 385 (width+ moves it down, height+ moves it right)
- 3" badges: Width = 205, Height= 260
- Set Orientation to Landscape
- Set Print Quality to 2 or 3 (start with 2 for speed).
- Set Ink Saturation to between 70% and 90%. Start with 80% and adjust as needed.
- If under "printer properties" there is a button that says "Change Properties", then there is a problem with the driver. It needs to be reinstalled under that account.
- You can try "Print Test Page" to see if windows can access the printer.
- To let all users use the printer: (you must be logged in as admin for the 3rd step)
- C:\Windows\system32\spool, r-click properties on the Printer folder, Security, users=full control
- C:\ProgramData, r-click properties on PTI folder, Security, users=full control
- Start, Control Panel, Devices and Printers, r-click Printer Properties, Security, Everyone= allow all
Settings for 4" wide by 2" tall labels
Confirmed on LX400 - not confirmed on LX500
In Primera driver:
Width=385 (adjust as needed)
Height=245 (adjust as needed)
Orientation=Portrait
In eVisitor:
Settings | Print Rotation Override = 90
Primera LX 500
- Install labels into printer
- Unpack printer and plug into power.
- Load labels into the printer. They go face up.
- Set the sensor to 2"
- Press feed on printer to feed a single label.
- Note: if you cannot reliably feed a single label, eVisitor will probably not be able to print.
- Configure Windows
- Plug the USB cord into the computer and load the driver. As of May 2022, the driver is ver 2.3.1.
- Set paper size:
- Inches.
- 4" badges: Width=245, Height = 385 (width+ moves it down, height+ moves it right)
- 3" badges: Width = 205, Height= 260
- Set Orientation to Landscape
- Set Print Quality to 2 or 3 (Start with 2 for speed)
- Set Ink Saturation to between 70% and 90%. Start with 80% and adjust as needed.
- Use PrintHub utility, Print Alignment to set left margin to 8. Adjust as needed.
- Print a test page.
- Note: If you can't reliably print a Windows test page, eVisitor will probably not be able to print.
- Configure eVisitor
- Login to eVisitor.
- Goto settings, devices, label printer and point to the "Color Label 500 ...".
- Set template to Full Expire.
- Test by printing several badges.
Copyright 2020 Data Management, Inc. All rights reserved.
1.800.243.1969